Cryptbreaker Installation
With the previous configuration steps completed all that’s left to do is run Cryptbreaker and perform the final in-app configuration steps.
Downloading and Running
How you run and install is up to you! Here we outline three different methods:
- Quick Start - Down and dirty, the fastest way to get the application running if you just want to test it out
- Advanced Installation - More detailed instructions for configuring a persistent data store to allow for application updates.
- Linux Install Script - The easiest way to get a full featured, auto-updating installation configured on Linux systems
Continue reading to find the solution that is best for you.
Quick Start
Since the latest official release of Cryptbreaker is published to docker hub installation is incredibly easy. If you want to get up and running to explore the tool you can just type docker run -p 127.0.0.1:3000:3000 -d sy14r/cryptbreaker:latest on the system where you’ve installed docker and wish to run the tool. This will automatically download and run the latest version of Cryptbreaker.
Breaking down the above command a little bit, docker run specifies to use the docker command to run a container. -p 127.0.0.1:3000:3000 says to bind to port 3000 on localhost and forward into the container that we will run on port 3000 (the Cryptbreaker app listens on port 3000 in the container). The -d flag says to daemonize the process (that is spin up the container and run it in the background). Lastly, we specify sy14r/cryptbreaker:latest to tell docker to run/use the latest version of the released sy14r/cryptbreaker container.
If you use the above quick start method, migration between versions of Cryptbreaker is not possible. And cracked data/reports generated from one version of Cryptbreaker will not migrate to a newer version when you download the update because the MongoDB is internal to the docker container. If you decide that you want to enable easy upgrades of Cryptbreaker as new versions are released and features role out, or if you just want a more persistant data layer for your database, follow the Advanced Installation below.
Advanced Installation
Once you’ve decided that you want to use Cryptbreaker regularly and desire for the ability to perform version upgrades and persist your local data a bit more permanently you’ll want to use the repository’s included docker-compose yaml file. You can get the YAML file directly here, or by git cloneing the repository, or (since you’re here already) by copy-pasting the following contents into a docker-compose.yml file locally.
# docker-compose.yml
version: "3.3"

services:
  app:
    image: sy14r/cryptbreaker:latest
    ports:
      - "3000:3000"
    links:
      - mongo
    environment:
      - MONGO_URL=mongodb://mongo:27017/meteor

  mongo:
    image: mongo:latest
    command: mongod --storageEngine=wiredTiger
    volumes:
      - db-data:/data/db

volumes:
  db-data:
With the docker-compose.yml file created, all you need to do is run docker-compose up from the command line in whatever folder you saved that file in.
Now, to get upgrades in the future just type docker-compose stop to stop and docker-compose pull to remove the Cryptbreaker and database containers (but all database contents will still be saved on your host computer’s file system) followed by docker-compose up -d.
Linux Install Script
If you’re using Linux as the host operating system you can simply download and use the install script from the official repository to install and configure Cryptbreaker for persistent data with auto-updates. Installation is as easy as 1-2-3.
- Ensure that you have the required dependencies installed first: git,docker, and docker-compose - also, your user must be a member of the docker group.
- Download the install script
- Run the install script as shown below:
➜ ./install.sh

[.] Checking for Required Dependencies
[+] Required Dependencies Present
[.] Downloading files...

Cloning into '/home/sy14r/.cryptbreaker'...
remote: Enumerating objects: 230, done.
remote: Counting objects: 100% (230/230), done.
remote: Compressing objects: 100% (143/143), done.
remote: Total 811 (delta 110), reused 163 (delta 82), pack-reused 581
Receiving objects: 100% (811/811), 16.48 MiB | 5.56 MiB/s, done.
Resolving deltas: 100% (355/355), done.

[?] Would you like to configure for nighlty auto-updates? [yN]: y
[.] Configuring for nightly auto-update
[+] Autoupdates enabled
[.] Starting Cryptbreaker
[.] Pulling latest images
[.] Launching Cryptbreaker

Creating network "cryptbreaker_default" with the default driver
Creating cryptbreaker_mongo_1 ... done
Creating cryptbreaker_app_1   ... done

[+] Cryptbreaker successfully installed
That’s it. Cryptbreaker is now running and will auto-update nightly at midnight.
Accessing and Configuring
With Cryptbreaker now running the next step is to access the web-ui and complete tool configuration. To access, just browse to http://localhost:3000 on whatever system is running the Cryptbreaker container.
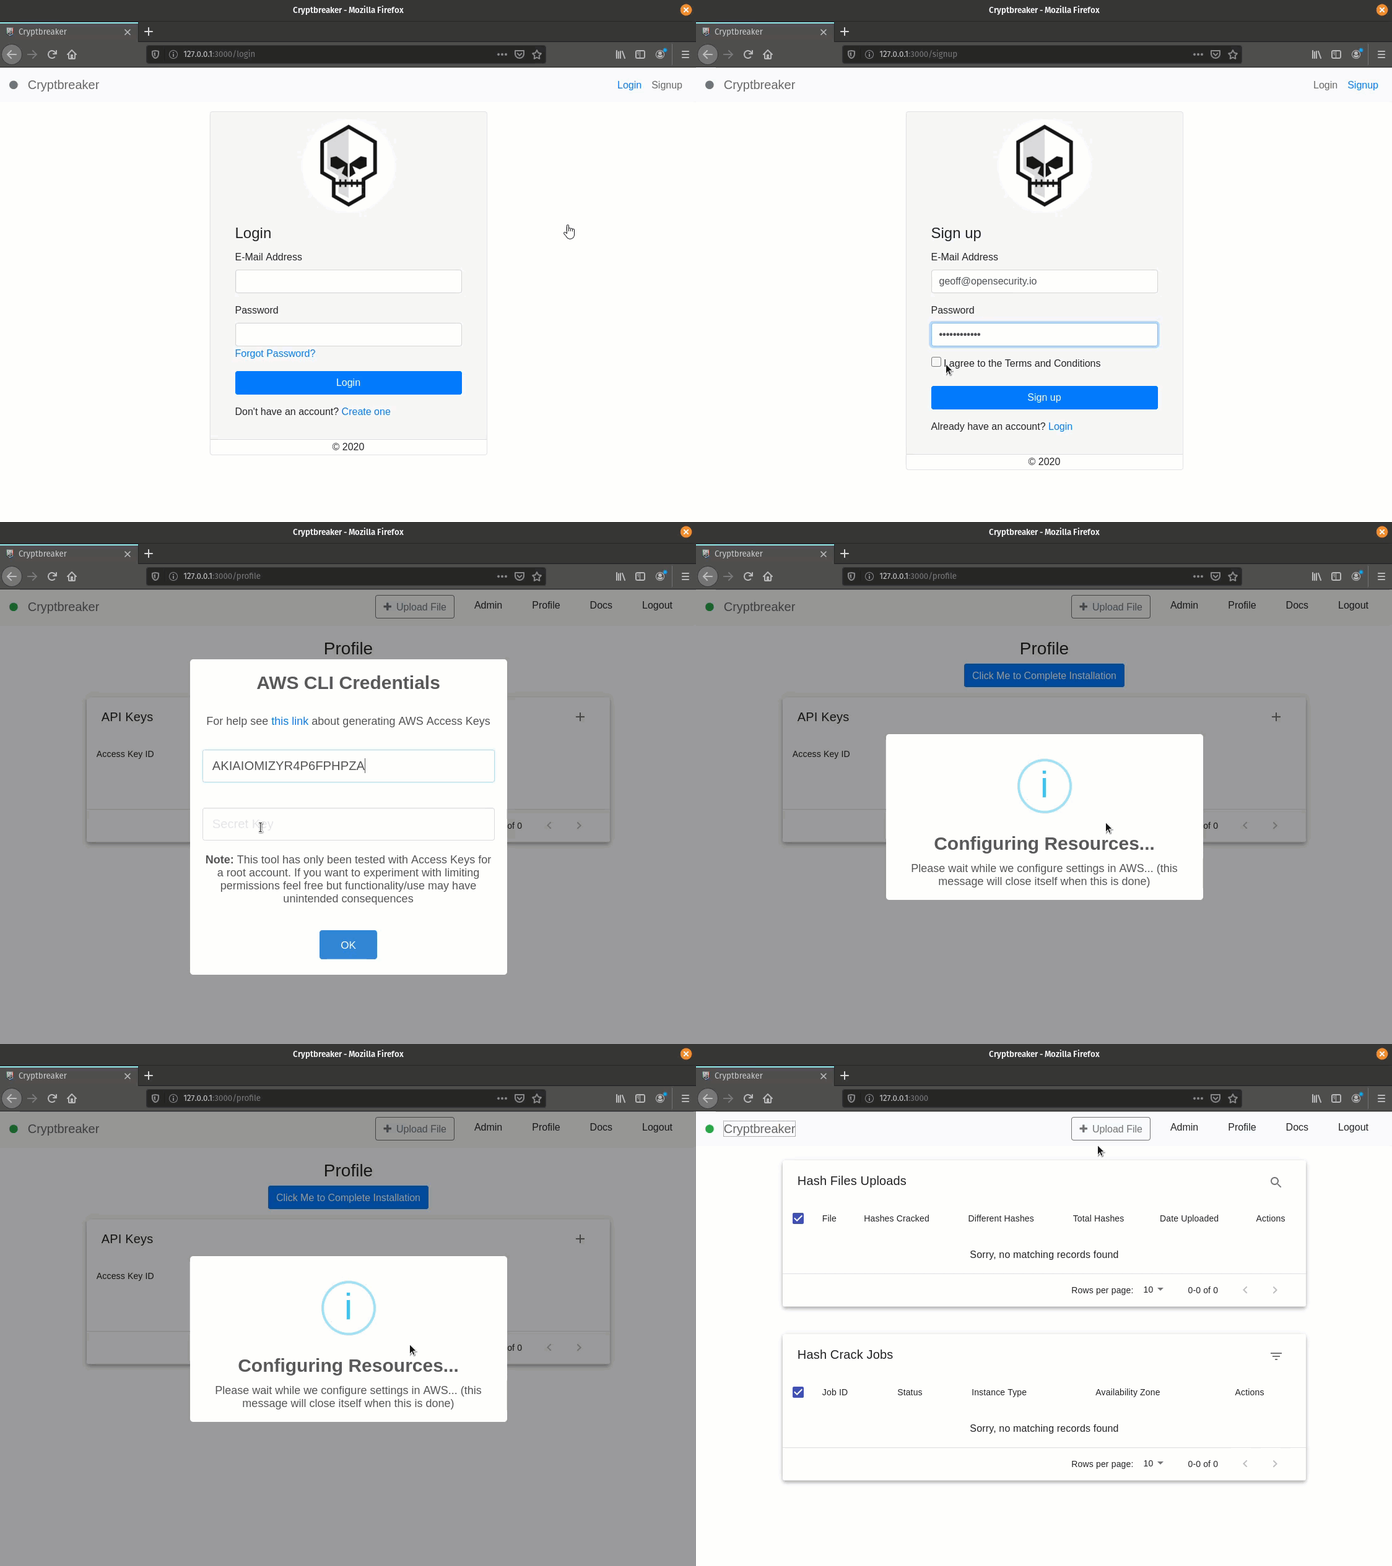
The first user to browse to the web-app and click the signup button on the top right and register an account is the default application adminstrator. Immediately upon registration you will be logged in and prompted to Complete Installation. By clicking ‘continue’ and providing the Access Key and Secret Key previously generated for your AWS account Cryptbreaker will verify the credentials and then prompt you to Configure Dependencies (see Architecture Details for more information about these dependencies). Once dependecy configuration is complete you should be good to begin using Cryptbreaker
If AWS Support hasn’t confirmed that your request to increase Spot Limits has been fulfilled you will be unable to perform cloud-backed cracking. Once that support case is completed you will be good to go.

You’re all good to go! For detailed information on tool features and capabilities feel free to explore the Documentation section of this site. If there are issues or you want to contribute check out the official GitHub repo!